1) YASTIKASANA (STICK POSE) (B)

INSTRUCTIONS
1. Lie on back legs fully extended and arms extended at the side of the body.2. be relaxed. Inhale for 3 seconds, raise arms above the head,rest them on the floor and stretch.
3. Holding breath,slowly stretch the body at full length,the toes and fingers pointing outward, as if trying to recach out.
4. retain this stretch for maximum 6 seconds,then release the tension of the stretch by exhaling for 3 seconds. Repeat the exercise for 3 to 4 times.
BENEFITS
* Since, it’s a stick asana; therefore, it has the ability to make the body as flexible as bamboo stick.* It provides adequate stretch to the spine.
* One can feel proper stretching in arms and thighs.
* It is also good for those who have tennis elbow.
* It can be practiced by those who have knee problems.
* It eases the pain of joints.
* It is helpful in de-stressing.
* It gives relaxation to abdominal and pelvic muscles and provides overall relaxation to the body.
CONTRAINDICATIONS
* Avoid this asana, if you have chronic back pain.* In case of high blood pressure and cardiac condition, avoid this asana.
* Person with spinal injuries, should perform with due care.
* Avoid during kyphosis.
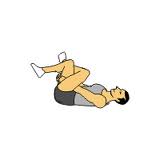
2) PAVANAMUKTASANA ( WIND RELIEVING POSE) (B)

INSTRUCTIONS
1. Lying on your back, inhale both knees into your chest. Wrap the arms around the knees, holding on to opposite elbows, forearms, wrists or fingers.2. Tuck the chin into the chest with the head on the floor. Press the sacrum and tailbone down into the floor as you pull the knees into the chest using the arms.
3. Press the shoulders and the back of the neck down into the floor, trying to get the back and whole spine flat to the floor. Relax the legs, feet and hips.
4. Breathe and hold for 4-8 breaths, breathing deeply into the belly, actively pressing it against the thighs on the inhalation.
5. To release: exhale and release the arms and legs to the floor.
BENIFITS
* Stretches the neck and back.* The abdominal muscles are tensed and the internal organs are compressed which increases the blood circulation and stimulates the nerves, increasing the efficiency of the internal organs.
* The pressure on the abdomen releases any trapped gases in the large intestine.
* Blood circulation is increased to all the internal organs.
* Digestive system is improved.
* Relieves constipation.
* Strengthens the lower back muscles and loosens the spinal vertebrae.
* Sterility and impotence.
CONTRAINDICATIONS
* Must be avoided if there is recent abdominal surgery as there is a lot of pressure on the abdomen.* Anyone suffering from hernia or piles should avoid this asana.
* Pregnant women should not practice this asana.
* If there is any pain, stiffness or injury to the neck the head should remain on the floor.
* Dislocation of knee joints
* Severe cardiac problem
3) MATSYASANA (FISH POSE) (B)

INSTRUCTIONS
1. Lie on your back. Your feet are together and hands relaxed alongside the body.2. Place the hands underneath the hips, palms facing down. Bring the elbows closer toward each other.
3. Breathing in, lift the head and chest up.
4. Keeping the chest elevated, lower the head backward and touch the top of the head to the floor.
5. With the head lightly touching the floor, press the elbows firmly into the ground, placing the weight on the elbow and not on the head. Lift your chest up from in-between the shoulder blades. Press the thighs and legs to the floor.
6. Hold the pose for as long as you comfortably can, taking gentle long breaths in and out. Relax in the posture with every exhalation.
7. Now lift the head up, lowering the chest and head to the floor. Bring the hands back along the sides of the body. Relax.
BENEFITS
* Stretches the chest and neck* Helps relieve tension in the neck and shoulders
* Provides relief from respiratory disorders by encouraging deep breathing
* Tones the parathyroid, pituitary and pineal glands
CONTRAINDICATIONS
* Avoid this posture if you have high or low blood pressure.* Migraine and insomnia patients should also refrain from doing the Fish Pose.
* Those who have had serious lower-back or neck injuries are strongly recommended not to practice this pose.
4) SUPTAPADANGUSTASANA (SUPINE HAND TO TOE)(B)
INSTRUCTIONS (VARIATION 1)

* Lie on the back with legs stretched, arms to the side.
* Exhale, bend the left knee up towards the chest, rap a belt/strap around the sole of the foot, hold both ends of the belt with both hands and straighten the leg up to be perpendicular to the floor.
* Keep the right leg extended and pressed down to the floor. Keep the right foot straight or slightly turning inwards. The right thigh should press down to the floor.
* Feeling the stretch in the left calf, push the left heel up and toes pulling towards you. Press the left thigh back. Keep the pelvis and hips aligned on the floor.
* Keep the abdomen relaxed. Hold the belt as close as possible to the foot, this will help opening the chest.
* Stay in the pose for 1 minute, breathing evenly. (for beginners: hold the pose for 20-30 seconds and increase with practice.)
* To release, exhale, bend the knee, release the belt, straighten the leg back to the floor. Switch to right leg.
INSTRUCTIONS (VARIATION 2)

* From step 2 in previous instructions, hold the belt with only the right hand and let the left hand rest on the side. Exhale and lower the right leg to the right. The right foot should be as far up as possible to be in line with the shoulder without lifting the left pelvis off the floor or loosing the position of the left leg. It is more important to keep the left pelvis on the floor than reaching with the right foot to the floor and in line with the shoulders. With regular practice of this asana (and other hip openers) you should be able to reach with the leg further without compromising the left pelvis.
* Keep the back of the trunk, the buttock and the entire left leg on the floor.
* Stay in the pose as per instruction 3 above.
* To release, Inhale and raise the right leg to be perpendicular to the floor.
* Exhale and lower the leg back down. Switch legs.
* For both variations, to keep the leg stretched on the floor without tilting it, press the sole of the foot against a wall. This will also ensure the body is correctly aligned.
BENEFITS
* Stretches hips, thighs, hamstrings, groins, and calves* Strengthens the knees
* Stimulates the prostate gland
* Improves digestion
* Relieves backache, sciatica, and menstrual discomfort
* Therapeutic for high blood pressure, flat feet, and infertility
CONTRAINDICATIONS
Do not practice this asana if you have asthma, bronchitis, migraine, stress related headache, eye strain, diarrhea.For high blood pressure, use a folded blanket under your head and neck.
Avoid variation I during menstruation.
5) JATHARA PARIVARTANASANA (BELLY TWIST) (B)
INSTRUCTIONS (VARIATION 1)

1. Lying on your back, bring your arms out to the sides with the palms facing down in a T position. Bend both knees into the chest.
2. Exhale drop both knees over to the left side of your body, twisting the spine and low back. Slide the knees as close to the left arm as possible. Look at the right finger tips.
3. Keep the shoulders flat to the floor, close the eyes, and relax into the posture. Let gravity pull the knees down, so you do not have to use any effort in this posture.
4. Breathe and hold for 6-10 breaths.
5. To release: inhale and roll the hips back to the floor.
6. Repeat on other side.
INSTRUCTIONS (VARIATION 2)

1. Lying on your back, bring your arms out to the sides with the palms facing down in a T position. Bend the knees in towards your chest and exhale both knees to the left side of your body.
2. Hold onto the right foot with your left hand as you straighten the right leg out to the side. Turn and look at the right finger tips.
3. Keep the shoulders flat to the floor, gently kick out through the heel to straighten the leg, reach the arms away from each other, close the eyes, and relax into the posture.
4. Breathe and hold for 6-10 breaths.
5. To release: let go of the foot, bend the knees and inhale the hips back to the floor.
6. Repeat on other side.
BENEFITS
Belly twist pose stretches the back and leg muscles, realigns and lengthens the spine, and hydrates the spinal disks.CONTRAINDICATIONS
Recent or chronic injury to the knees, hips or back.6) ARDHA PAWANAMUKTASANA (HALF WIND RELEIVING POSE) (B)

INSTRUCTIONS
1. Lying on your back, inhale the right knee in towards the chest. Interlace the fingers and inch or two below the kneecap.2. Tuck the chin into the chest with the head on the floor. Gently pull the knee into the chest using the arms, avoiding the ribcage.
3. Press the shoulders and the back of the neck down into the floor, keep the elbows close to the sides of the body. Relax the legs, feet and hips.
4. Breathe and hold for 4-8 breaths, breathing deeply into the belly, actively pressing it against the thighs on the inhalation.
5. To release: exhale and release the arms and leg to the floor.
6. Repeat on other side.
BENEFITS
* Helps in getting rid of the trapped gas in the digestive system, in large intestine.* Improves blood circulation to the digestive system.
* Relieves indigestion and constipation.
* Excessive fat in the thighs, buttocks and tummy, is reduced when done regularly.
* Helps in reducing acidity, dyspepsia and bloating.
* Helps in the treatment of menstrual problems.
* Reduces stiffness in shoulder and waist.
* Can help in the treatment of impotency and sterility.
* Improves flexibility of the knee joints.
CONTRAINDICATIONS
* This asana should not be done during pregnancy.* Avoid this asana if suffering from piles or hernia.
* If you have any back problem/ pain, avoid doing this pose.
* Do not do this asana if you had any abdominal surgery.
7)SETU BANDHANASANA (BRIDGE POSE) (B)
INSTRUCTIONS
1. Lying on your back, bend both knees and place the feet flat on the floor hip width apart. Slide the arms alongside the body with the palms facing down. The fingertips should be lightly touching the heels.2. Press the feet into the floor, inhale and lift the hips up, rolling the spine off the floor. Lightly squeeze the knees together to keep the knees hip width apart.
3. Press down into the arms and shoulders to lift the chest up. Engage the legs, buttocks and mula bandha to lift the hips higher.
4. Breathe and hold for 4-8 breaths.
5. To release: exhale and slowly roll the spine back to the floor.
BENEFITS
* Strengthens the back muscles* Relieves the tired back instantaneously
* Gives a good stretch to the chest, neck and spine
* Calms the brain, reducing anxiety, stress and depression
* Opens up the lungs and reduces thyroid problems
* Helps improve digestion
* Helps relieve the symptoms of menopause and menstrual pain
* Helpful in asthma, high blood pressure, osteoporosis, and sinusitis
CONTRAINDICATIONS
Avoid doing this pose if you are suffering from neck,shoulder and back injuries.8) SUPTA VIRASANA (SUPINE HERO POSE) (I)

INSTRUCTIONS
1. From a seated position on the heels, walk the feet out so that the buttocks can rest on the floor with the heels next to the hips.2. Slowly and carefully walk the hands behind you, lowering the back towards the floor.
3. Come as low to the floor as comfortable, first lowering to the elbows, then to the crown of the head, and eventually on to the back of the neck.
4. Rest the hands along side the body, with the hands resting on the feet or upper thighs.
5. Breathe and hold for 4-8 breaths.
6. To release: hold on to the ankles or feet and press into the elbows using the arms to lift the head and torso back off the floor. Walk the hands back to the hips, coming back to a seated position.
BENEFITS
* Stretches the abdomen, thighs and deep hip flexors (psoas), knees, and ankles* Strengthens the arches
* Relieves tired legs
* Improves digestion
* Helps relieves the symptoms of menstrual pain
CONTRAINDICATIONS
If you have any serious back, knee, or ankle problems, avoid this pose unless you have the assistance of an experienced instructor.9) EKA PADA SETU BANDHANASANA (ONE LEGGED BRIDGE POSE) (I)
INSTRUCTIONS
1. Lie on your back with your knees bent, feet on the floor, and arms at your sides, palms down. Press your feet and arms firmly into the floor and lift your hips toward the ceiling.2. Roll your shoulders underneath your body and clasp your hands. Extend your arms along the floor beneath your pelvis. Keep your thighs and feet parallel.
3. Press firmly into your left foot. Exhaling, bend your right knee and draw it in toward your chest. Inhaling, extend your right leg up toward the ceiling. Reach through the ball of your foot and bring your leg as vertical as possible.
4. Lift your hips as high as your can. Lengthen your entire spine.
5. Press evenly through your left foot — do not roll to the outer edge of your foot.
6. Hold for up to 10 seconds. Exhale as you lower your right foot to the floor. Repeat with your left leg for the same length of time.
7. To release the pose, unclasp your hands and rest them alongside your body, palms down. Slowly roll down, one vertebra at a time. Let your knees drop together and rest.
BENEFITS
* Stretched and opened chest, heart, shoulders, spine, neck, thighs, and hip flexors* Strengthened core muscles
* Revitalized legs
* Stimulated abdominal organs and thyroid glands
* Improved digestion and regulated metabolism
* Increased energy
* Relief from stress, fatigue, anxiety, and mild depression
* Relief from headaches and insomnia
* Increased lung capacity and relief from asthma
CONTRAINDICATIONS
Do not attempt to practice this pose if you can't do Bridge Pose with correct alignment. Do not perform this pose if you have a neck or shoulder injury.10) ARDHA SUPTA VIRASANA (SUPINE HALF HERO POSE) (I)

INSTRUCTIONS
1. From a seated position on the heels, extend the right leg straight out in front of you, slide the left foot out so that the buttocks can rest on the floor with the heel next to the hips.
2. Slowly and carefully walk the hands behind you, lowering the back towards the floor.
3. Come as low to the floor as comfortable, first lowering to the elbows, then to the crown of the head, and eventually on to the back of the neck.
4. Rest the hands along side the body, or along the floor over the head with the palms together.
5. Breathe and hold for 4-8 breaths.
6. To release: hold on to the ankles or feet and press into the elbows using the arms to lift the head and torso back off the floor. Walk the hands back to the hips, coming back to a seated position. Repeat on other side.
BENEFITS
Half Supine Hero pose provides a powerful stretch to the front of the thighs and increases flexibility in the knees, hips and spine.CONTRAINDICATIONS
Recent or chronic knee injury or inflammation.11) ANANDA BALASANA (JOYFUL BABY POSE) (B)

INSTRUCTIONS
1. Lying on your back, inhale both knees into your chest. Bring the arms through the insides of the knees and hold on to the outside edge of each foot (pinkie toe side) with each hand.2. Tuck the chin into the chest with the head on the floor. Press the sacrum and tailbone down into the floor as you press the heels up and pull back with the arms.
3. Press the shoulders and the back of the neck down into the floor, trying to get the back and whole spine flat to the floor. If you want a deeper stretch in the hips, let the legs open a bit wider.
4. Breathe and hold for 4-8 breaths.
5. To release: exhale and release the arms and legs to the floor.
BENEFITS
Joyful baby pose releases the low back, lengthens and realigns the spine, strengthens the legs and opens the hips.CONTRAINDICATIONS
Recent or chronic injury or inflammation to the legs, shoulders or neck.12) SUPTA BADDHA KONASANA (SUPINE BOUND ANGLE POSE) (B)

INSTRUCTIONS
1. Lying on your back, bend the knees and bring the bottoms of the feet together. Bring the feet to the floor with the heels close to the hips. Let the knees open wide apart.2. Inhale and slide the arms along the floor up over your head. Place the palms together, crossing the thumbs.
3. Breathe and hold for 4-8 breaths.
4. To release: exhale and gently release the arms and legs.
BENEFITS
Supine bound angle is a simple posture which gently opens the hips and the shoulders.CONTRAINDICATIONS
Recent or chronic injury to the hips or shoulders.13) HALASANA (PLOW POSE) (I)

INSTRUCTIONS
1. Lie on your back with your arms beside you, palms downwards.2. As you inhale, use your abdominal muscles to lift your feet off the floor, raising your legs vertically at a 90-degree angle.
3.Continue to breathe normally and supporting your hips and back with your hands, lift them off the ground.
4. Allow your legs to sweep in a 180-degree angle over your head till your toes touch the floor. Your back should be perpendicular to the floor. This may be difficult initially, but make an attempt for a few seconds.
5. Hold this pose and let your body relax more and more with each steady breath.
6. After about a minute (a few seconds for beginners) of resting in this pose, you may gently bring your legs down on exhalation.
BENEFITS
* Strengthens and opens up the neck, shoulders, abs and back muscles.* Calms the nervous system, reduces stress and fatigue.
* Tones the legs and improves leg flexibility.
* Stimulates the thyroid gland and strengthens the immune system.
* Helps women during menopause.
CONTRAINDICATIONS
- Diarrhea
- Menstruation
- Neck injury
- Asthma & high blood pressure: Practice Halasana with the legs supported on props.
- Pregnancy: If you are experienced with this pose, you can continue to practice it late into pregnancy. However, don't take up the practice of Halasana after you become pregnant.
- With the feet on the floor, this pose is considered to be intermediate to advanced. It is not advisable to perform the pose in this way without sufficient prior experience or unless you have the supervision of an experienced instructor.
14) SUPTA KAPOTASANA (SUPINE PIGEON POSE) (B)
INSTRUCTIONS
• Laying on your back• Bend your knees so both feet are flat on the floor
• Bring your right ankle to top of left knee (ankle should be in line with femur bone)
• Flex both heels
• Take your right hand split between your legs through the triangle opening between legs and hold onto your left thigh
• Grab onto the outside of your left thigh with left hand
• Relax head and neck pulling legs into chest
• Brig left ankle in line with left knee
• Your left calf should run parallel to the mat
• Keep hips level on the floor
• Stay here for five breaths then switch sides
BENEFITS
Deeply stretches the hips, thighs, and glutesOpens the low back
Improves circulation through the hips, legs, and back
Increases blood flow to the pelvis and surrounding organs, helping to relieve digestive discomfort and menstrual pains.
Relieves stress and soothes anxiety
CONTRAINDICATIONS
Recent or chronic knee, hip or shoulder injury or inflammation.15) URDHVA DHANURASANA (UPWORD BOW POSE) (I)

INSTRUCTIONS
1. Begin by lying flat on your back with your arms at your sides. Bend your knees, keeping your feet parallel and aligned with your hips. Draw your heels close to the edges of your buttocks.2. Reach your arms up overhead, and then bend your elbows so that you can place your palms on the floor at either side of your head. Your fingertips should rest beneath your shoulders. Keep your forearms parallel as you extend your fingers toward your heels. Reach your elbows directly up toward the ceiling.
3. Inhale as you press your feet firmly into the floor and lift your hips upward toward the ceiling. Contract your buttocks, thigh, and abdominal muscles to support your lower back.
4. Keep your feet and legs parallel. Press through the palms of your hands and lift your shoulders off the mat.
5. Realign your arms to make sure they remain parallel — do not let your elbows splay to the sides. Hold for a few breaths.
6. On an exhalation, straighten your arms and lift your head completely off the floor. Press the weight of your hands equally through your index fingers. Draw your chest toward the wall closest to your head.
7. Do not rest your bodyweight on your head. Do not crunch your neck. As you gain strength and flexibility, you will be able to lift your head off the mat!
8. Lift your chest even more toward the wall behind you. Straighten your arms and legs even more. Turn your thighs slightly inward. Broaden your shoulder blades across your back. Let your head hang. Gaze at the floor between your hands.
9. Hold for up to 20 breaths. Release the pose by first bringing the crown of your head to the mat, and then your whole body. Rest on your back with your knees bent and dropped together.
BENEFITS
* This pose stretches the spine, shoulders, chest, upper back, and thighs.* It also strengthens the arms, wrists, spine, legs, and abdomen.
* The deep back-bending aspect of this pose opens the lungs, which makes it therapeutic for asthma.
* Additionally, this pose stimulates the thyroid and pituitary glands, increasing energy and providing relief from mild depression.
CONTRAINDICATIONS
Do not practice this pose if you are currently experiencing high or low blood pressure, headaches, diarrhea, or heart problems. Also avoid this pose if you have a back injury or carpal tunnel syndrome.Upward Bow requires a great deal of strength and flexibility to be performed correctly. It is very easy to injure yourself if you attempt to move into it too soon.
16) SARVANGASANA (SHOULDER STAND) (I)

INSTRUCTIONS
* Lie on your back with hands by your side.* With one movement, lift your legs, buttocks and back so that you come up high on your shoulders. Support your back with the hands.
* Move your elbows closer towards each other, and move your hands along your back, creeping up towards the shoulder blades. Keep straightening the legs and spine by pressing the elbows down to the floor and hands into the back. Your weight should be supported on your shoulders and upper arms and not on your head and neck.
* Keep the legs firm. Lift your heels higher as though you are putting a footprint on the ceiling. Bring the big toes straight over the nose. Now point the toes up. Pay attention to your neck. Do not press the neck into the floor. Instead keep the neck strong with a feeling of tightening the neck muscles slightly. Press your sternum toward the chin. If you feel any strain in the neck, come out of the posture.
* Keep breathing deeply and stay in the posture for 30-60 seconds.
* To come out of the posture, lower the knees to forehead. Bring your hands to the floor, palms facing down. Without lifting the head slowly bring your spine down, vertebra by vertebra, completely to the floor. Lower the legs to the floor. Relax for a minimum of 60 seconds.
BENEFITS
* Stimulates the thyroid and parathyroid glands and normalizes their functions* Strengthens the arms and shoulders and keeps the spine flexible
* Nourishes the brain with more blood
* Stretches the heart muscles by returning more venous blood to the heart
* Brings relief from constipation, indigestion and varicose veins
CONTRAINDICATIONS
MenstruationHigh blood pressure
Glaucoma
Detached retina
Pregnancy
Heart problem
Slip disc
Spondylosis
Neck pain
Acute thyroid problem.
17) SAVASANA (CORPS POSE) (B)

INSTRUCTIONS
1. Lying on your back, let the arms and legs drop open, with the arms about 45 degrees from the side of your body. Make sure you are warm and comfortable, if you need to place blankets under or over your body.2. Close the eyes, and take slow deep breaths through the nose. Allow your whole body to become soft and heavy, letting it relax into the floor. As the body relaxes, feel the whole body rising and falling with each breath.
3. Scan the body from the toes to the fingers to the crown of the head, looking for tension, tightness and contracted muscles. Consciously release and relax any areas that you find. If you need to, rock or wiggl part sof your body from side to side to encourage further release.
4. Release all control of the breath, the mind, and the body. Let your body move deeper and deeper into a state of total relaxation.
5. Stay in Shavasana for 5 to 15 minutes.
6. To release: slowly deepen the breath, wiggle the fingers and toes, reach the arms over your head and stretch the whole body, exhale bend the knees into the chest and roll over to one side coming into a fetal position. When you are ready, slowly inhale up to a seated position.
BENEFITS
* Calms the brain and helps relieve stress and mild depression* Relaxes the body
* Reduces headache, fatigue, and insomnia
* Helps to lower blood pressure
CONTRAINDICATIONS
Back injury or discomfort: Do this pose with your knees bent and your feet on the floor, hip-distance apart; either bind the thighs parallel to each other with a strap (taking care not to position the heels too close to the buttocks) or support the bent knees on a bolster.Pregnancy: Raise your head and chest on a bolster.
PRECAUTIONS
Do not practice any Asana OR Pranayama in which you don’t feel comfortable.
Do not over do the exercises if you feel pain in your body.
Start exercises mildly and then increase the repetitions as per your capacity.
People suffering from Back pain, Slip disc OR chronic disease should only practice Yoga and other exercises under the expert supervision otherwise do not do it.
Pregnant women should only practice Yoga under the supervision of an expert, otherwise do not practice any exercise by watching videos or website material.
No comments:
Post a Comment